| |
| |
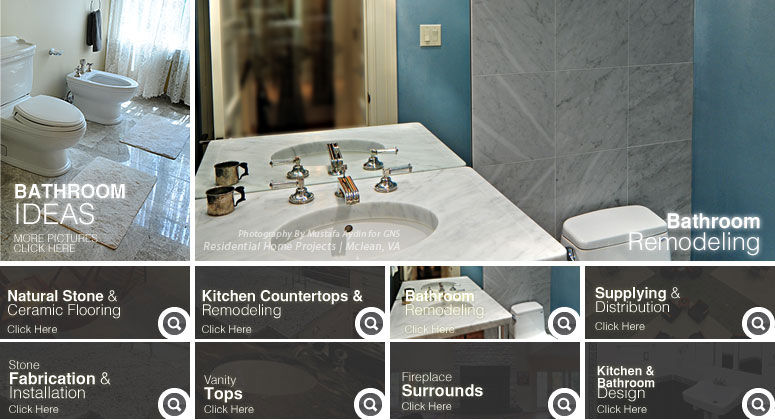
Bathrooms are one of the most important rooms in the house. It is known sure that it is in top 3 that the home buyers are always looking for good bathroom when they are about the buy a house.
Even for your own pleasure bathrooms have to be the best.
GNS offers full service bathroom remodeling including but not limited to; flooring, shower tiles, bathroom tiling, vanities, and etc.
Please consult with us with your upcoming bathroom projects.
|
|
iCREATING FUNCTIONAL SPACE |
Whether it's a full-size bath or a powder room, the arrangement of space plays a large role in how well the room will function.
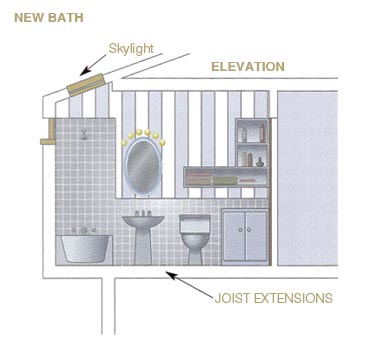
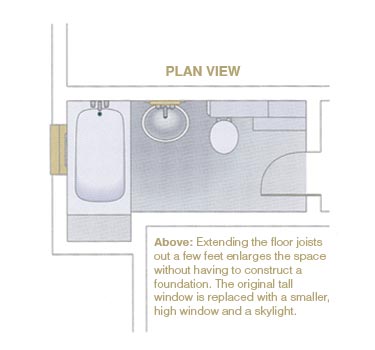
A bathroom addition to an outside wall of the house offers the best possibilities for unencumbered floor space. However, it will be the costliest. One way to save money is to bump out the wall by a few feet and extend the existing floor structure out over the foundation. Consult an architect or builder, first, to make sure the structure is sound and can cany the additional load. Always inquire about local zoning ordinances that may affect your plans before proceeding. If you violate codes, you could be forced to remove the new construction. |
 |
|
 |
 |
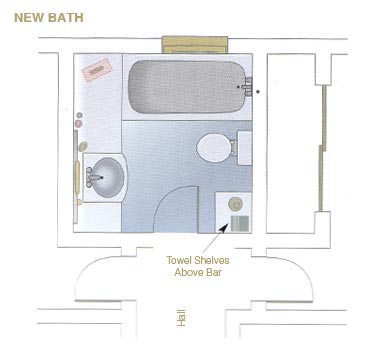 |
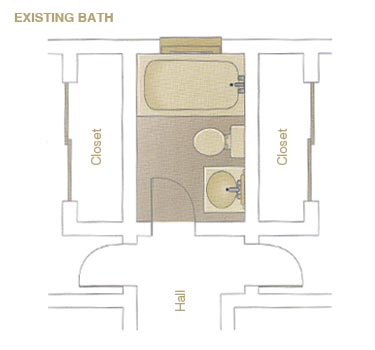
Existing Bath: This typical in-line full bath is situated between two bedrooms. Large closets behind the bathroom's walls offer possibilities for expanding the bathroom's size.
New Bath: By expanding into the closet of the left bedroom, there is enough room to include a generous vanity on one side of the room and add shelves to a corner. |
CAN'T ADD-ON?
If you can't improve the layout of an existing bath by building an addition, take a good look at areas that are adjacent to the room, such as hallways or unused space under a stairway. Sometimes even a small amount of space stolen from a closet or an adjacent room can be the answer to your problem. If your family requires two bathrooms but there's only enough room for one, forego a spacious master bath for two smaller, side-by-side bathrooms. You'll save money this way, too, because the plumbing lines for both rooms will be right there.
REARRANGING AN EXISTING LAYOUT
If the existing floor plan works for you, all you have to think about is updating old fixtures, installing new tile, and perhaps replacing the cabinetry. Even so, you may want to play around with the idea of modifying the layout on paper. You may be surprised to discover, in fact, that a few minor changes in the floor plan can enhance your original arrangement. Just keep in mind: Moving plumbing fixtures in an existing bath may significantly raise costs.
SMART STEPS
ONE: Make a new base drawing. Like the base drawing you made for the old bathroom, use a V2-inch scale. If you are using a V-j-inch grid, each square represents a 6-inch square of real floor space. Begin by drawing the outer walls, and then add the windows and doors.
TWO: Make templates of the fixtures. Paper templates of fixtures and cabinets are an easy way to experiment with different layouts. First draw the fixtures to scale on graph paper, and then cut them out so you can move them around your plan. If you have collected pictures and spec sheets (printed product information from the manufacturer), use the dimensions given.
|
 |
|
 |
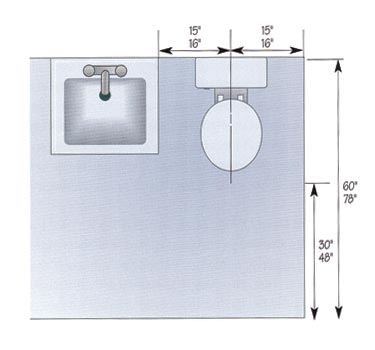
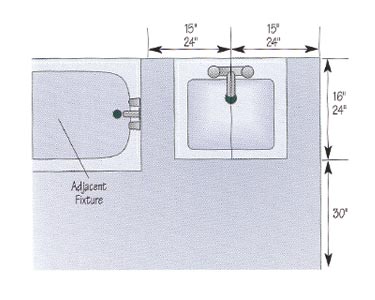
Top left and right: When planning toilet and bidet placement, use these dimensions to determine the necessary clearances. The bottom number is the preferred minimum clearance. However, if you are short on space, you can use the top dimension, which will not compromise the accessibility of the layout for most people.
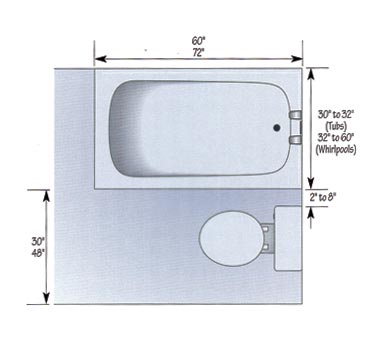
Bottom left and right: Use these clearances for rectangular tubs and whirlpools and corner tubs. Try to allow more space than the minimum clearance required by code the smaller dimension. |
 |
|
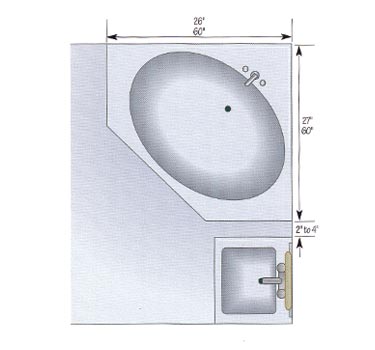 |
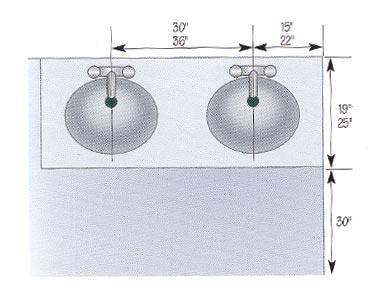
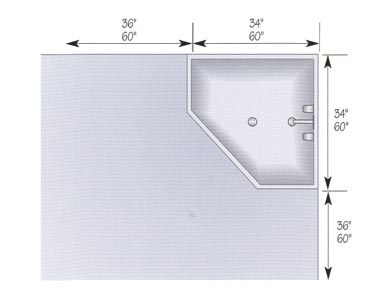
include both the fixtures and the required front and side clearances that way you won't get caught short. Usually, plumbing codes require a minimum clearance for each fixture. Fixture clearances are shown in the drawings on this and the next two pages. The top number of each pair indicates the minimum required by code or function. The bottom dimension allows more room between fixtures. For an efficient but convenient layout, aim for somewhere between the two numbers when you draw your plan, if the size of your bathroom permits. |
 |
|
 |
THREE: Place the fixtures. You will use some fixtures more often than others: first the lavatory, next the toilet, then the tub or shower. An efficient plan places the lav closest to the door, followed by the toilet, and finally the tub, which is located the farthest away.
If there is any leeway in your plan, place the toilet so that it will not be visible when the door is open. Even in a small bathroom, the direction of the door swing can help shield the toilet from view. Another easy way to place fixtures on your plan is to start with the largest ones. If you know you want a whirlpool bath and separate dual shower, pencil them in first. (Hint Position the length of the tub perpendicular to the joists to distribute the weight safely. |
If you don't, you'll incur the costs of adding structural support to the floor.) To make the tub the focal point of the room, put it opposite the door or within a direct line of view from the door.
If there will be a separate tub and shower, locate them near each other so that they can share plumbing lines and the same sight lines. This also makes it easier to plan the space around them.
After placing the big items, locate your lavatory. Do you want two lavs or just one? Do you want two lavatories near each other or located on opposite sides of the room? Do you want two toilets? Will two people use the room at once? Answer these questions before you pencil in the location.
Smart Tip About Planning
The easiest and least costly remodels take advantage of the existing water supplies, drain lines, and vent stacks. If you want to add a bath or expand one, try locating it next to an existing one.
Even stacking the rooms one over the other on different floors can take advantage of the existing lines and lower the cost of building or rebuilding the bath.
Another cost-cutting measure is limiting the plumbing fixtures to two walls.This avoids the need for and expense of additional plimbing lines.
|
|
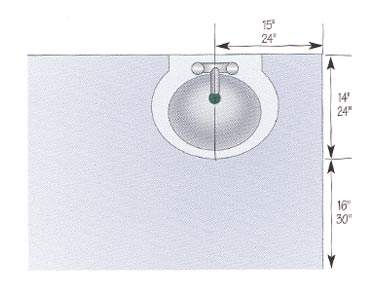 |
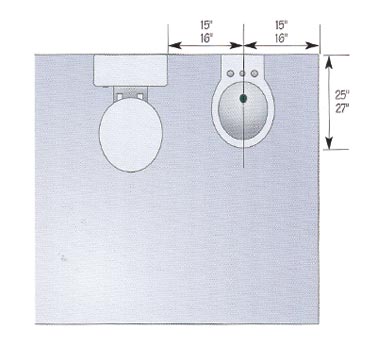
Clockwise from the top left: If you don't have a specific lavatory in mind, use these general clearances for wall-hung, freestanding, and vanity-mounted units. The larger dimension is the preferred clearance, but if necessary, the smaller dimension can be used. |
 |
|
 |
Left and far left:
Shower dimensions vary widely from the minimum usable size to the most generous. When space is tight, consider a corner unit. Don't forget to plan for clearance; the smaller dimension is the minimum clearance needed.
If you are placing two lavatories side by side, leave enough maneuvering space and elbow room. One smart way to do this is to install storage between them. Some families install two lavatories at different heights. Not only is this more comfortable and ergonomic, it defines space as adult-designated or child-designated in a bathroom shared by all.
Once you have the lavatories in place, go ahead and locate the toilet and bidet, if you have one. (A bidet resembles a toilet, but is actually a basinlike device for personal hygiene.) The bidet is another item you will want to keep away from the bathroom door and out of its sight line.
With the main elements penciled in, start adding the extras the windows, doors, greenhouse, gym, sauna, and whatever other amenities you are considering. You can play with the design as long as you like, trying different ideas and placements, as long as you take practical matters like pipes and codes into consideration.
Although there are recommended guidelines for comfort and convenience, only you will be able to determine what will be most comfortable for you. If you happen to be 7 feet tall, you can probably forget about the height clearances and raise them! Likewise, if you are a small person, lower the counters. Don't worry about being able to resell your home later; another person of your height may appreciate the comfort of a higher or lower surface. If the need arises, installing a new vanity with standard-height countertop is not easy, but it's not a major project either. |
 |
|
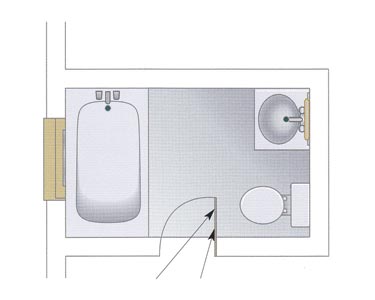 |
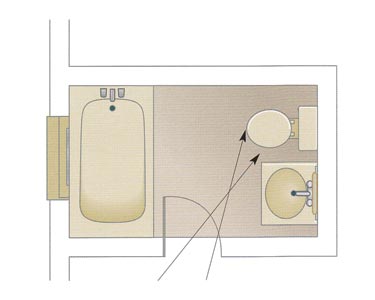
Right: This bathroom allows full view of the toilet from outside the room.
Far right: Better privacy is obtained by flopping the toilet and the sink and reversing the door swing. |
|
|
|